23 Feb 2021 |
Soul |
本篇文章主要内容如下:
Soul是什么- 如何在本地运行
Soul
- 对
Soul进行压测
Soul 是什么
Soul是什么?它可不是灵魂交友软件!
引用Soul的官网,它是这样描述Soul的:
这是一个异步的,高性能的,跨语言的,响应式的API网关。我希望能够有一样东西像灵魂一样,保护您的微服务。参考了Kong,Spring-Cloud-Gateway等优秀的网关后,站在巨人的肩膀上,Soul由此诞生!
Soul是一个网关,它的特点如下:
- 支持各种语言(
http协议),支持 dubbo,spring cloud协议。
- 插件化设计思想,插件热插拔,易扩展。
- 灵活的流量筛选,能满足各种流量控制。
- 内置丰富的插件支持,鉴权,限流,熔断,防火墙等等。
- 流量配置动态化,性能极高,网关消耗在
1~2ms。
- 支持集群部署,支持
A/B Test,蓝绿发布。
来自官网的一张架构图

从上面的架构图可以看出,Soul网关与语言无关,各种语言(Java,PHP,.NET等)都可以接入到网关中。它通过对不同插件的支持实现各种功能(监控,认证,限流,熔断,不同用户接入等)。在后台管理系统(soul-admin)就可以灵活配置各种流量。
如何在本地运行 Soul
好了,知道了Soul是一个网关,那么接下来就看看怎么使用它。 通过案例演示的方式比直接了解各个概念的方式更能激发兴趣,所以开始play it吧!
-
从官网拉取项目源码 git clone git@github.com:dromara/soul.git,当前最新版本是2.2.1。
-
创建并切换分支git checkout -b myLearn,就在自己的在本地跑,直接用master分支也行。
-
使用IDEA打开项目,然后本地编译一下,确保没有错。
第一次编译会很慢,需要下载依赖。当然,也可以跳过相关测试和注释,这样会快一点。
mvn clean install -Dmaven.test.skip=true -Dmaven.javadoc.skip=true
-
启动Soul的后台管理地址,就是项目源码中的soul-admin模块,这是一个SpringBoot项目,只需要修改一下数据库的地址就可以运行了。项目会自动创建对应的库和表。

项目启动后的登录地址是http://localhost:9095/,默认用户名是admin,密码是123456。后台界面如下:

主要模块有插件列表和系统管理,在插件列表中可以对各个插件进行管理,每个插件都可以添加多个选择器,每个选择器都可以添加多条规则。实际这就是Soul根据请求的URL去匹配规则:插件->选择器->规则,这个后面再细说。
-
启动Soul的核心模块soul-bootstrap,这是网关的核心处理逻辑。不要怕它,这个模块本身不复杂,目录结构如下:

启动成功后,就可以访问这个网关了http://127.0.0.1:9195/,返回信息如下:
{"code":-107,"message":"Can not find selector, please check your configuration!","data":null}
因为还没有接入业务系统,所以没有相关返回值,上面展示的信息是Soul网关没有找到相应的选择器,返回的一个提示信息
-
通过上述步骤,就成功的搭建起Soul网关服务了,后面就是在自己的业务系统上使用网关。使用例子可以参考soul-examples模块。
-
本文运行soul-examples下面的 http服务,结合divde插件,发起http请求到soul网关,体验http代理。模块目录及配置信息如下:

配置文件中有关soul的配置我们后面再详细解释,现在只需要知道这个服务就是一个很普通的Spring Boot项目。其中的一个接口信息如下:

运行SoulTestHttpApplication,启动这个项目。成功之后,通过postman进行访问:

上面就是一个普通的http请求,直接请求业务系统的后端服务,现在通过Soul网关来访问该服务。

这个localhost:9195地址就是网关的地址,/http是业务系统在网关中的名称。那么,现在的请求就是先通过Soul网关,再由网关转发到实际的请求接口。
对 Soul 进行压测
成功在本地运行Soul网关之后,我们最后再来看看Soul网关的性能如何。在windows平台可以通过SuperBenchmarker工具进行压测。压测设置的参数是200个请求,32个并发,100秒内执行完。

然后再来看一下直连的情况:

可以看到 直连的RPS(3916.9)还是大于经过网关转发后的RPS(1526.3 ),毕竟多了网关这一层的转发。
小结一下,本篇文章介绍了Soul网关的特点和架构设计。然后,拉取soul源码,在本地运行测试案例。最后,对soul网关进行了简单的压测。
参考文章:
07 Feb 2021 |
Soul |
本篇文章分析的是Sentinel插件,它也可以提供熔断和限流的功能。
操作前准备:启动soul-admin,soul网关,soul-examples-http测试用例。
Sentinel功能演示
首先在soul网关中添加Sentinel插件,引入依赖:
        <!-- soul sentinel plugin start-->
        <dependency>
            <groupId>org.dromara</groupId>
            <artifactId>soul-spring-boot-starter-plugin-sentinel</artifactId>
            <version>${project.version}</version>
        </dependency>
        <!-- soul sentinel plugin end-->
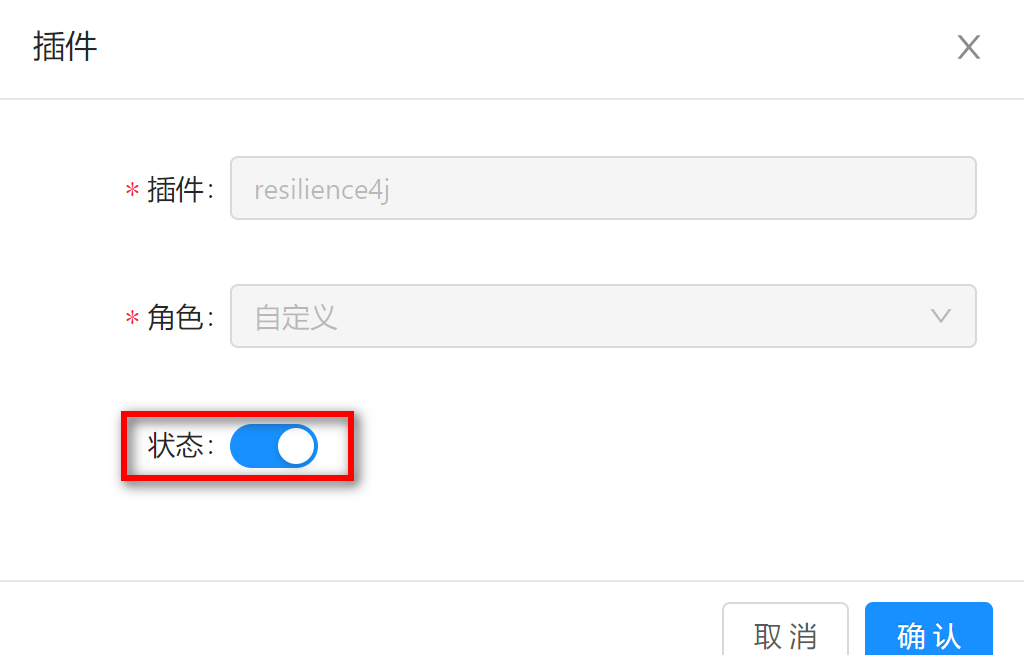
然后需要在soul-admin中依次开启插件,添加选择器,添加规则:


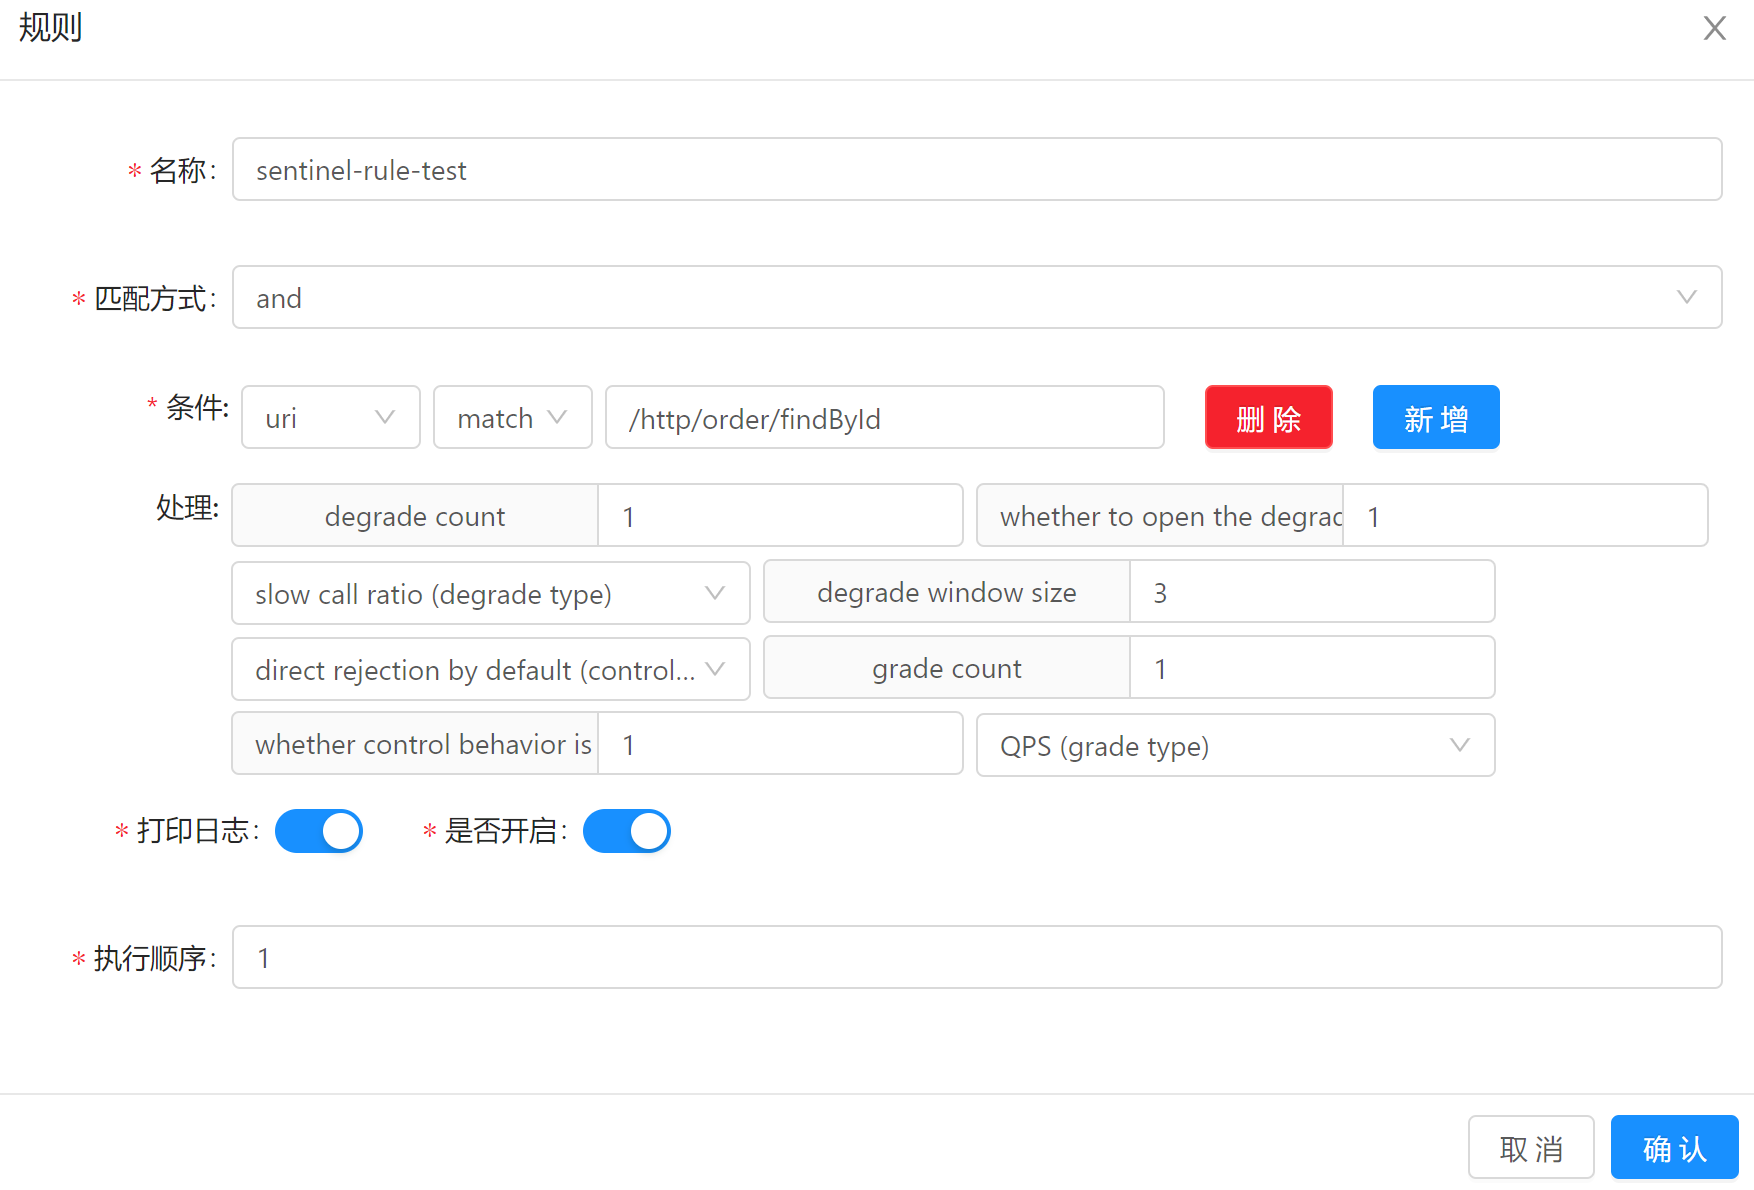
规则字段解析:
degrade count: 熔断阈值;whether to open the degrade (1 or 0): 是否开启熔断;degrade type: 熔断策略,支持秒级 RT/秒级异常比例/分钟级异常数;control behavior: 流控策略(直接拒绝 / 排队等待 / 慢启动模式),不支持按调用关系限流;grade count:限流阈值;whether control behavior is enabled (1 or 0): 是否开启限流;grade type: 限流类型,QPS 或线程数模式。
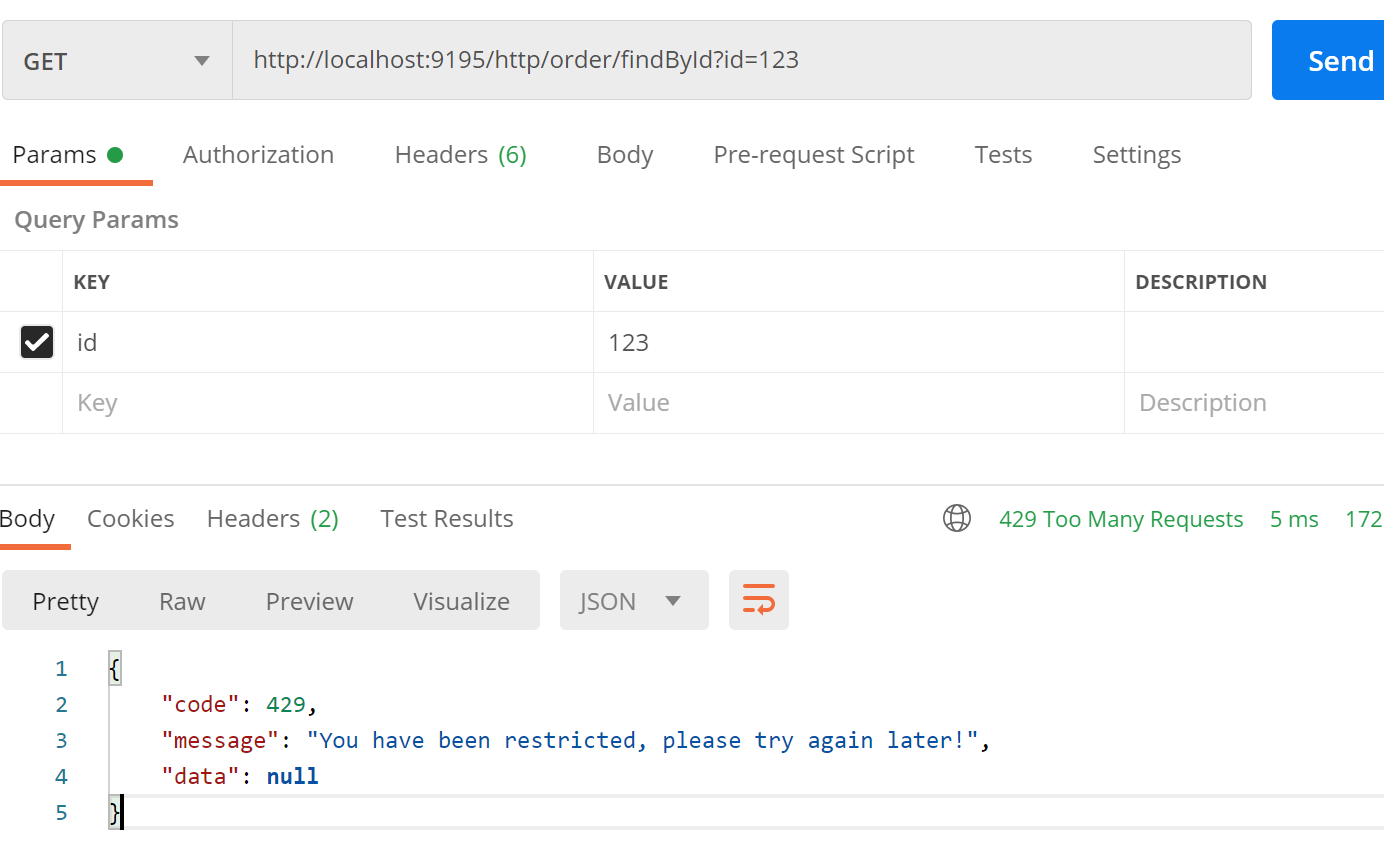
上述准备工作完成后,就能进行测试了。开启限流,设置流控阈值为1,然后多点几次 postman,即会发生限流现象:

Sentinel原理分析
SentinelPlugin 继承于模板抽象类 AbstractSoulPlugin,所以 doExecutor 是其执行真正功能逻辑的代码:
    protected Mono<Void> doExecute(final ServerWebExchange exchange, final SoulPluginChain chain, final SelectorData selector, final RuleData rule) {
		//省略了其他代码
        SentinelHandle sentinelHandle = GsonUtils.getInstance().fromJson(rule.getHandle(), SentinelHandle.class);
        //限流或降级执行类 SentinelReactorTransformer
        //责任链继续执行
        return chain.execute(exchange).transform(new SentinelReactorTransformer<>(resourceName)).doOnSuccess(v -> {
            //不成功,则抛出降级异常
            if (exchange.getResponse().getStatusCode() != HttpStatus.OK) {
                HttpStatus status = exchange.getResponse().getStatusCode();
                exchange.getResponse().setStatusCode(null);
                throw new SentinelFallbackException(status);
            }
        }).onErrorResume(throwable -> sentinelFallbackHandler.fallback(exchange, UriUtils.createUri(sentinelHandle.getFallbackUri()), throwable));
    }
限流或降级执行类是 SentinelReactorTransformer,来自于Sentinel插件。集成Sentinel插件就是以上代码,使用起来还是比较简单。
Sentinel规则在admin修改后,会同步更新到SentinelRuleHandle:
public void handlerRule(final RuleData ruleData) {
        SentinelHandle sentinelHandle = GsonUtils.getInstance().fromJson(ruleData.getHandle(), SentinelHandle.class);

        //更新限流规则
        List<FlowRule> flowRules = FlowRuleManager.getRules()
        if (sentinelHandle.getFlowRuleEnable() == Constants.SENTINEL_ENABLE_FLOW_RULE) {
			//省略了其他代码
        }
        FlowRuleManager.loadRules(flowRules);

        //更新熔断降级规则
        List<DegradeRule> degradeRules = DegradeRuleManager.getRules()
        if (sentinelHandle.getDegradeRuleEnable() == Constants.SENTINEL_ENABLE_DEGRADE_RULE) {
		//
        }
        DegradeRuleManager.loadRules(degradeRules);
    }
小结,本文结合实际案例演示了Sentinel插件,跟踪了Sentinel插件源码。
06 Feb 2021 |
Soul |
本篇文章分析的是Resilience4j插件,它可以提供熔断和限流的功能。
操作前准备:启动soul-admin,soul网关,soul-examples-http测试用例。
Resilience4j功能演示
要在soul网关使用Resilience4j插件,需要引入依赖:
        <!-- soul resilience4j plugin start-->
        <dependency>
            <groupId>org.dromara</groupId>
            <artifactId>soul-spring-boot-starter-plugin-resilience4j</artifactId>
            <version>${project.version}</version>
        </dependency>
        <!-- soul resilience4j plugin end-->
然后需要在soul-admin中依次开启插件,添加选择器,添加规则:
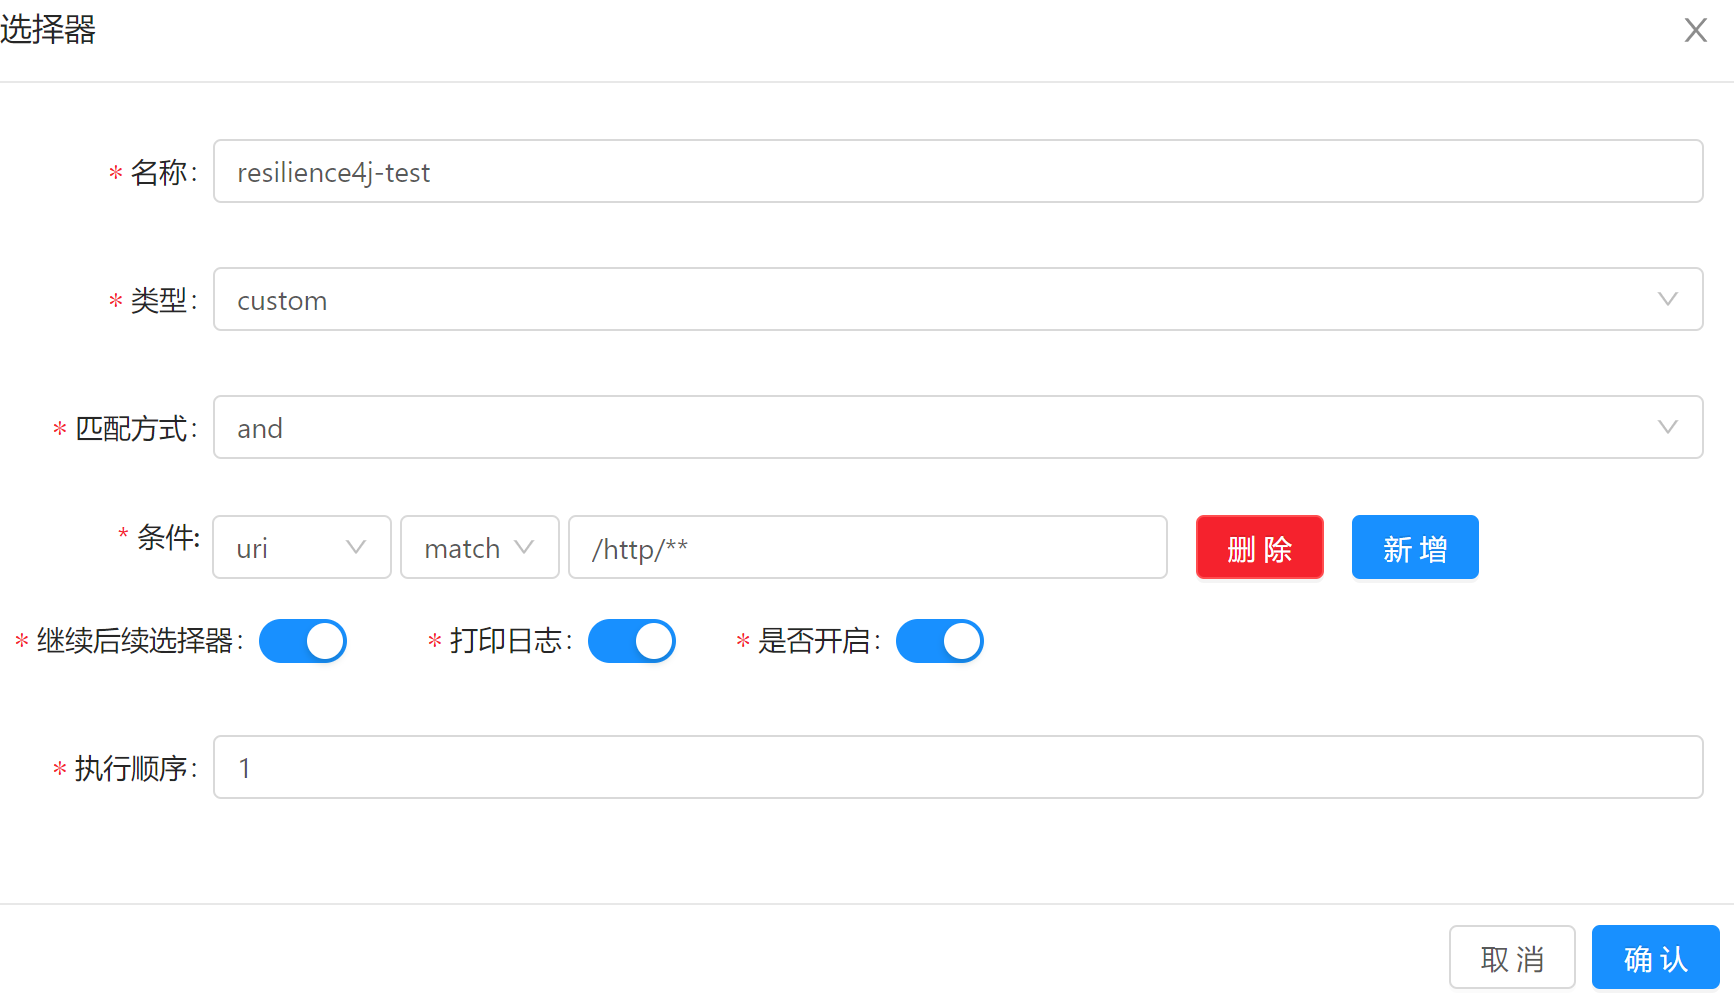

规则字段解析:
token filling period(limitRefreshPeriod): 刷新令牌的时间间隔,单位ms,默认值:500。token filling number(limitForPeriod): 每次刷新令牌的数量,默认值:50。control behavior timeout(timeoutDurationRate): 熔断超时时间,单位ms,默认值:30000。circuit enable(circuitEnable): 是否开启熔断,0:关闭,1:开启,默认值:0。circuit timeout (timeoutDuration): 熔断超时时间,单位ms,默认值:30000。fallback uri(fallbackUri): 降级处理的uri。sliding window size(slidingWindowSize): 滑动窗口大小,默认值:100。sliding window type(slidingWindowType): 滑动窗口类型,0:基于计数,1:基于时间,默认值:0。enabled error minimum calculation threshold(minimumNumberOfCalls): 开启熔断的最小请求数,超过这个请求数才开启熔断统计,默认值:100。degrade opening duration(waitIntervalFunctionInOpenState): 熔断器开启持续时间,单位ms,默认值:10。half open threshold(permittedNumberOfCallsInHalfOpenState): 半开状态下的环形缓冲区大小,必须达到此数量才会计算失败率,默认值:10。degrade failure rate(failureRateThreshold):错误率百分比,达到这个阈值,熔断器才会开启,默认值50。
上述准备工作完成后,就能进行测试了。每次刷新令牌的数量调成了只有一个,刷新时间要 100s,所以只要多点几次 postman,即会发生限流现象:
Resilience4j原理分析
Resilience4JPlugin 继承于模板抽象类 AbstractSoulPlugin,所以 doExecutor 是其执行真正功能逻辑的代码:
    protected Mono<Void> doExecute(final ServerWebExchange exchange, final SoulPluginChain chain, final SelectorData selector, final RuleData rule) {
		//省略了其他代码
        //是否开启熔断
        if (resilience4JHandle.getCircuitEnable() == 1) {
            return combined(exchange, chain, rule);
        }
        //限流处理
        return rateLimiter(exchange, chain, rule);
    }
主要功能是判断是否开启熔断,如果是,就进入组合模式(即处理熔断又处理限流);否则,只做限流处理。
    private Mono<Void> combined(final ServerWebExchange exchange, final SoulPluginChain chain, final RuleData rule) {
        //设置管理后台配置的规则
        Resilience4JConf conf = Resilience4JBuilder.build(rule);
        return combinedExecutor.run(
            	//执行责任链后续操作
                chain.execute(exchange).doOnSuccess(v -> {
                    //省略了其他代码
                }),
            fallback(combinedExecutor, exchange, conf.getFallBackUri()), //降级处理
            conf); // Resilience4J相关配置
    }
combinedExecutor.run()方法负责执行真实的逻辑:先执行熔断的功能,后执行限流的功能。再处理超时,错误信息,最后进行降级处理。
    public <T> Mono<T> run(final Mono<T> run, final Function<Throwable, Mono<T>> fallback, final Resilience4JConf resilience4JConf) {

        //链式调用
        Mono<T> to = run.transformDeferred(CircuitBreakerOperator.of(circuitBreaker))//先处理熔断
                .transformDeferred(RateLimiterOperator.of(rateLimiter))//后限流
                .timeout(resilience4JConf.getTimeLimiterConfig().getTimeoutDuration())//超时处理
                .doOnError(/*...*/);//错误处理
        if (fallback != null) {
            to = to.onErrorResume(fallback);//降级处理
        }
        return to;
    }
    private Mono<Void> rateLimiter(final ServerWebExchange exchange, final SoulPluginChain chain, final RuleData rule) {
        return ratelimiterExecutor.run(
                chain.execute(exchange),  //责任链继续执行
            fallback(ratelimiterExecutor, exchange, null), //降级处理
            Resilience4JBuilder.build(rule))//规则配置
                .onErrorResume(throwable -> ratelimiterExecutor.withoutFallback(exchange, throwable));
    }
限流的功能主要在ratelimiterExecutor.run()中,负责生成限流器并执行。
    @Override
    public <T> Mono<T> run(final Mono<T> toRun, final Function<Throwable, Mono<T>> fallback, final Resilience4JConf conf) {
        //限流器
        RateLimiter rateLimiter = Resilience4JRegistryFactory.rateLimiter(conf.getId(), conf.getRateLimiterConfig());
        Mono<T> to = toRun.transformDeferred(RateLimiterOperator.of(rateLimiter));//执行限流功能
        if (fallback != null) { //降级
            return to.onErrorResume(fallback);
        }
        return to;
    }
小结,本文结合实际案例演示了Resilience4j插件,并分析了组合模式和限流模式的执行原理。